

![]()
Today’s post is the 3rd in a short series on underlining!
I get a lot of questions about underlining, so I finally decided to start dispelling the myths. In the first post in this series, I talked a lot about what the sewing technique of underlining is, why you might underline a garment, and offered suggestions for fabrics to use when underlining.
In the second post, I talked about why I love using my muslin mockups as underlining and shared a how-to video of me creating the dress you see in this post using the technique.
In this third and final post, I share the results!
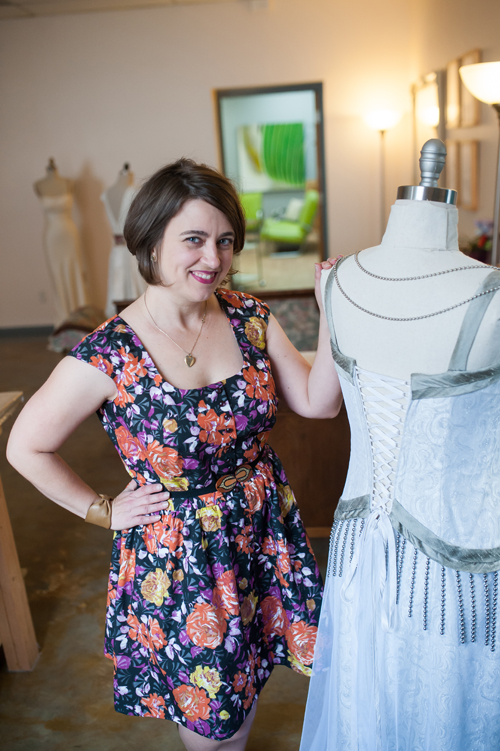
Here’s my dress all done!
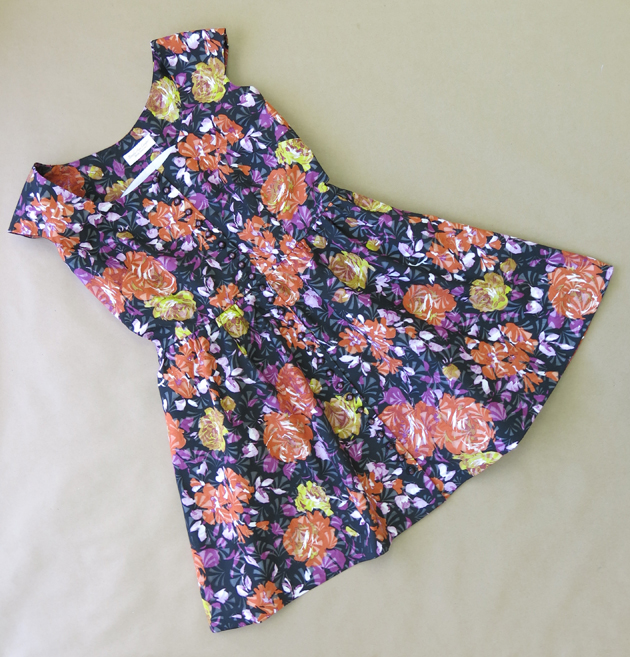
Isn’t it cute? It is made of a beautiful cotton blend print from my favorite fabric store Mulberry Silks & Fine Fabrics. (At the time of this posting there is still some left, so if you love it as much as I do, go snag some yardage!)
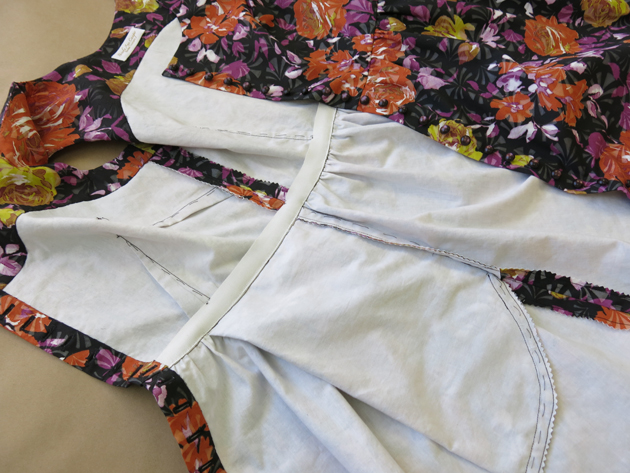
And here’s a peek at what it looks like on the inside:
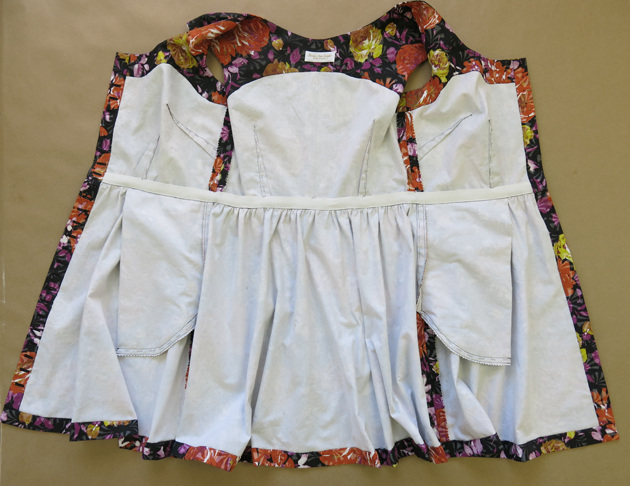
To beautifully finish my hems, button plackets, and facings, I was able to do a slip stitch by hand while hiding all my stitches in the underlining fabric. As I sewed, I just picked my needle and thread through this muslin layer, leaving the fashion fabric free of any stitch lines or prick marks.
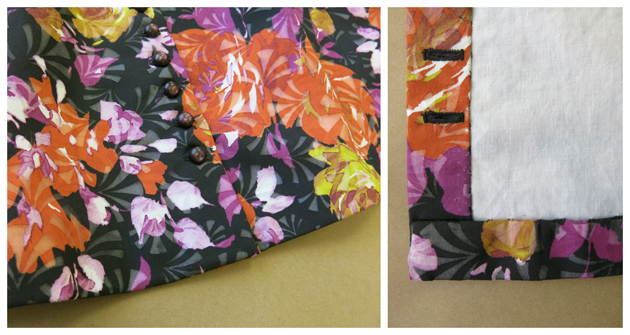
Here you can see how beautiful (and invisible!) the hem looks from the outside, and the tiny slip stitches along the edge of the hem and button placket that only catch the underlining fabric from the inside:
If I wanted to, I could even stitch down my seam allowances to the underlining keeping them nice and flat. This is a casual dress for me so I didn’t line it or stitch back my seam allowances. I simply finished my raw edges using the stitch-and-pink method.
Stitched and pinked seams, slip stitched facing:
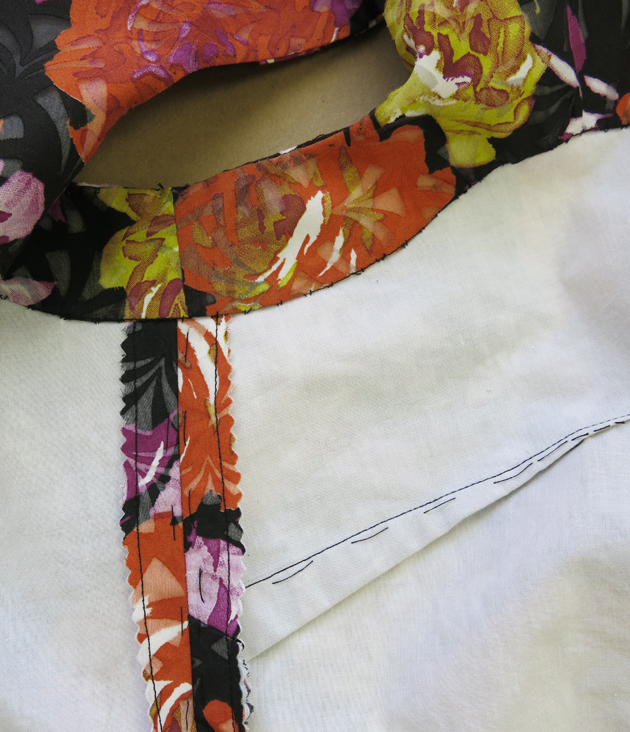
Yes, you can still see my underlining stitches!
Some people like to pull them out, but I usually just leave them in. They don’t affect the dress, so I see pulling it out is just extra work. I actually love having the story of how the dress was made to stay visible inside.
As I mentioned in the first post, underlining does not cover the inner construction details like a lining does. If you’d rather not see seam allowances or markings on the inside, you can add a lining just like you would for any garment.
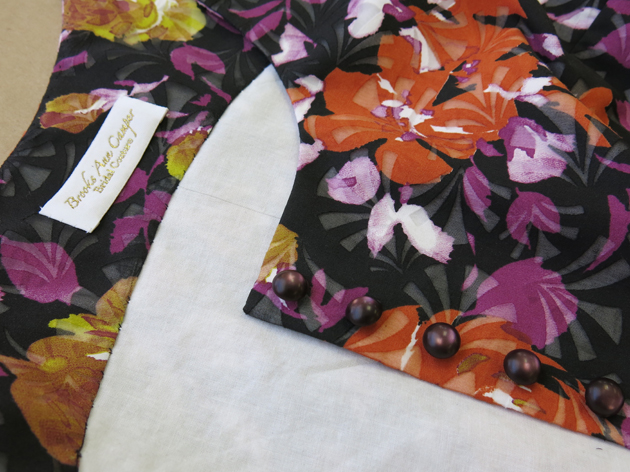
Yes, you can see my pencil marks from the mockup fitting inside the garment, but that also doesn’t bother me one bit. In fact to me, it is part of the appeal!
I love that custom clothes have stories and histories of their own! I see these tell-tale signs of hand-crafted work as superior to factory-manufactured clothes. I want my clothes to tell a story to someone who sees it, inside and out.
So that’s it for this series on underlining! If you missed the two previous posts and the video, start here.
I hope these posts inspire you to try underlining your next garment. If you have any questions or comments just enter them below this post!
[separator2]
A condensed version of this blog series was published in Seamwork Magazine. Check it out here: https://www.seamwork.com/issues/2015/12/under-construction
Visit my Classes Page for info on online courses and more! https://brooksann.com/classes/


20 Responses
The wedding dress in this photo was also created using the muslin mockup as underlining.
You can read the series of posts following this dress’s creation starting here: https://brooksann.com/my-best-friends-custom-wedding-dress/
Dear Ms Brooks, thank you for this very helpful series on underlining. It certainly opens a wider world of opportunities for the fabrics I would like to use for dresses, shirts and jackets. I get the impression you use underlining in the way one would use interfacing.
I have a question about lining the dress. Up till now I always line my dresses just in case I would wear nylon stockings as in the colder seasons (autumn, winter). Would underlining be sufficient to prevent the fabric sticking to the stockings?
What are your thoughts on this?
Thank you for your answer, Audrey
Great question Audrey!
I almost always both line and underline my garments. That said, if you chose a fabric as your underlining that was the same type of fabric that you’d use for a lining (china silk, habotai, crepe de chine, bemberg…), I would think it whould keep the stockings from sticking, just as a lining would.
If you give it a try, let me know how it goes!
Also, a version of this post is in this month’s Seamwork Magazine, if you’d like to check it out: https://www.seamwork.com/issues/2015/12/under-construction
Thanks so much for your comment!
You´re welcome. And thank you for your swift and interesting reply. Very nice food for thought. I am already getting images of combinations. I will certainly give it a try for my next dress and will let you know.
I really do love those cut-in-one princess seam sleeves! They really allow the fabric to flow giving a beautiful clean line.
Thanks Desirae! Cut-in-one sleeves have always been my favorite.
This was so so so helpful! I really want to underline and line a dress. But I’ve never done it before! Your photos, descriptions and video are super clear. I feel like I can do it! Looking on websites and books, some people say to only baste the center line, then fold the fabric over your hand or a magazine to adjust for the inside being slightly smaller than the outside, before basting the rest. What do you think about this? I noticed it wasn’t in your video, but wasn’t sure if it was too complicated for most sewers, or if you feel it’s not needed?
So glad to help Erika! I’ve seen the method you’ve mentioned in home sewing magazines too, but it doesn’t make much sense to me. The way I described is the way I’ve always done it and the way that it has always been done in the professional workrooms and costume shops where I’ve worked. It has always been my understanding that you want to keep the two layers absolutely flat and working exactly as one, rather than making them slightly different from each other. But there’s always more than one way to accomplish the same thing! Try whichever method you think will work for you and let me know how it goes!
How do you get your facing pattern pieces? Do you make them from your muslin as pattern before starting construction? Also do you underline your facings too?
Hi Allison! I make my own patterns so I drafted my facings directly from my custom drafted paper pattern. Just gave myself a few inches around the armhole and drew a curved line that looked the way I wanted it to. I waited until after I’d made my fitting corrections, so that any changes would be transferred from the dress pattern to the facings patterns. I don’t use my muslin as my pattern. I always have a paper pattern, using it to record my corrections and to draw onto my muslin. As for underlining facings, it’s up to you! If you feel like you need more oomph to those pieces, you can underline them. If you feel like they don’t need it, then it may not be necessary. In this dress, I did not also underline my facing pieces. But if you had a facing that you were planning to interface, you could underline instead. Hope this helps!
Hi Brooks Ann,
I love how you stiched and pinked your seams. I have managed to collect two pairs of pinking shears so far in my short four years of learning to sew fom home, have never used them this way because I’m nervous and inexperienced, of course. Lol! But if you tell me the seams are durable, I will try.
At the moment I bind my seams, French seam them, and recently started turning and stitching where zippers go. Sometimes I feel like I’ve wasted money buying them but I’ve consoled myself that they’re handy for notching curves. I need to us them more often. When I settle down properly and set up a proper sewing cave, I will look into a home serger, just because it’s trendy and everyone on Instagram has them. ????. I believe you use industrial sergers, right?
I’m also a firm believer of underlining as well as lining a garment together after learning about them on numerous sites run by talented pople like yourself. I’ve been working on my drafted bodice and my fashion fabric is for sure, one that needs both. I just need to nudge myself to stop being nervous and work on completing a real blouse!
Hi Angelina!
While I did inherit my grandmother’s cute industrial serger, I can’t recall ever using it. I personally do not like the manufactured look of serged edges, so I’m personally not a serger user. Many people want their sewing projects to look “store-bought”, but I love to see the mark of the maker. I love all the hints that it was made by a person, instead of a factory.
And here’s your nudge to get you to try things: What’s the worst that can happen? You mess up a blouse? Not really a huge risk in the scheme of things. And mistakes teach you lessons so, no matter the outcome, you’ll be better off than if you never got started.
Happy Sewing!
Brooks Ann
Ann,
This is where I am a lot like you as well! I learnt to finish seams (solely on the internet) the traditional way and actually love them and enjoy incorporating them into my projects. It just gives me aspecial connection I believe I wouldn’t get from a serger. I’ve made a number of toddler and little girl clothes that my daughter has now outgrown that I don’t post on Instagram (only opened a sewing account in July). Some people say it’s tedious, but to me, it is part of what makes the garment unique. And it’s perfect for custom sewing as opposed to mass-producing a garment to meet a deadline. It’s like I travel back in time when it was all people knew and still, they made exquisite garments. I just turned 29 two weeks ago and I keep telling myself that I was born at the wrong time!
Yes, I totally agree with you that mistakes are actually learning elements or stepping stones. Without them, what is there to learn and improve on?! I’ve experienced it personally in my sewing life. I will go back and do the last few adjustments and stitch a fourth mock up. I actually followed a tutorial by another patternmaker and instagrammer back in Jan before even getting myself some patternmaking books. The methods in the books look easier (or maybe I am more familiar with the process as well) but since I’ve come so far, I didn’t want to throw my sweat (and tears?) away.
Thanks for the heads up! And happy couturing to you as well.
P.S. I read your post about your sewing machines too. Being your visitor must be fun! All I’d do is stalk your machines until you tell me to leave! ????
Hi Brooks Ann,
Thank you for such a detailed helpful guide to underlining. I’m in the process of making a velvet dress which I chose to underline and it’s been immensely helpful for the construction of the piece. I think I’m hooked!
I had two questions that I wonder if you might give your input on–you mentioned that when you’re making a garment, you make the mockup out of the underlining fabric and then take the muslin apart and attach it to your fashion fabric for final construction. This makes perfect sense to me and seems a huge time saver. In a class I’ve taken on couture sewing, the instructor suggested disassembling the muslin mockup and using it as a pattern rather than using it as the underlining. My question is with your method do you fit the garment and then go back and record those fitting changes on the paper pattern? If not, what is your method of recording the fitting changes?
My second question is about underlining stretch fabrics–do you think its possible to use your method of making the mockup out of the underlining if the underlining and the fashion fabric are stretch fabrics? I ask because as you mention the process of underlining requires a lot of hand sewing and in most of the resources I’ve seen about underlining and couture sewing I haven’t seen much if any instruction about how to work with stretch and knit fabrics by hand. Would one need to use a machine to baste the fabrics and the mock up together?
I hope my questions aren’t too confusing! I would love to have any insights you might be able to share.
Thanks again for all the incredible information you share on your blog! This is one of the most interesting and detailed sewing sites I’ve come across.
Cori
Yay! Hi Cori! So happy to hear that my posts have helped you fall in love with this technique. I looooooove underlining…
To answer your first question, I usually do go back and clean up my fitting changes on the paper pattern before using the corrected paper pattern to draw new stitching lines back onto the mockup fabric. If you look closely in some of the pics in these posts, you’ll see some of my original lines crossed out next to nearby correction lines drawn on the fabric.
And I unfortunately don’t have a lot of advice for your second question! I can’t remember the last time I worked with stretch fabrics (not my area of expertise or interest). Natalie Chanin (of Alabama Chanin) teaches hand sewing using stretch fabrics. Her methods might help you.
Hope this helps! Thanks so much for your interest and good luck on your projects!
Do you have any good tips for underlining & adding a lining to a decorative scallop eyelet? I can’t quite figure out the construction in my mind for the top seam of the underlining/lining. Where is the attachment?
Sounds like you might have to get creative! The finishing techniques you choose will likely depend on your specific fabric combos and what sort of look you are going for. Play around and work through some samples using your fabrics until you discover a process/result you like!
hi
many thanks for the wonderful tutorials. I have learnt so much.
regarding the hem. do you cut the interlining on the finished hem line and just turn up one layer of fabric please or leave interlining attached and turn both up.
many thanks in advance.
regards Ann
Hi Ann! Thanks for following along! Once the two flat layers became one, I continued to treat them as if they were one throughout construction. I turned up all layers into my hem. But there’s no reason (that I can think of) why you can’t trim some out, if that works better for your hem. Hope this helps!